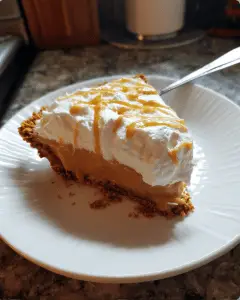
There’s something magical about chilled desserts, especially when the summer heat rolls in. Enter the Cherry Icebox Pie—a classic, creamy, fruity treat that never fails to impress without ever turning on the oven. With its luscious cherry filling, cool creamy layers, and buttery crust, this nostalgic dessert is as easy as it is delicious. Whether […]
Pin itCherry Icebox Pie – The Ultimate No-Bake Dessert Guide | Recipesgem
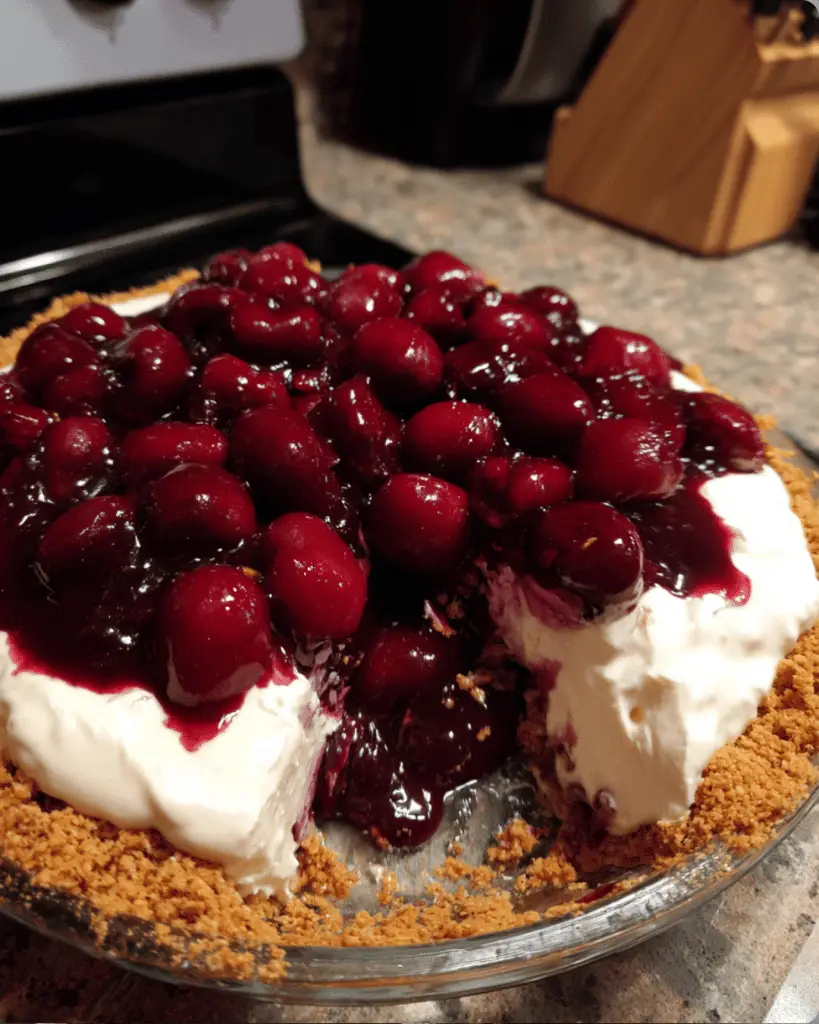
There’s something magical about chilled desserts, especially when the summer heat rolls in. Enter the Cherry Icebox Pie—a classic, creamy, fruity treat that never fails to impress without ever turning on the oven. With its luscious cherry filling, cool creamy layers, and buttery crust, this nostalgic dessert is as easy as it is delicious. Whether you’re hosting a backyard BBQ, planning a holiday meal, or just craving something sweet and refreshing, cherry icebox pie delivers in every bite.
In this guide, we’ll break down everything you need to know about this timeless no-bake pie—from why it’s called an “icebox pie,” to what thickens cherry filling best, and how to enhance its flavor like a pro. Whether you’re a pie lover or a first-time baker, this step-by-step article will help you create a cherry icebox pie that’s as visually stunning as it is crave-worthy.
Before refrigerators became a household staple, families used iceboxes—insulated cabinets cooled with blocks of ice—to store perishable foods. In those days, icebox pies emerged as a practical solution for satisfying sweet cravings without needing a hot oven. These no-bake pies became especially popular in the early 20th century, combining convenience with the rich, creamy textures people loved.
Cherry icebox pie is a vintage favorite from this era. Unlike baked pies that rely on flour-thickened fillings and crusts that need heat to crisp, icebox pies stay entirely cold. The fillings are usually stabilized with whipped cream, condensed milk, or pudding, and the crust is often made from crushed cookies or graham crackers.
What Makes Cherry Icebox Pie Unique?
While there are many no-bake desserts, cherry icebox pie stands out for its bright, tart-sweet flavor and creamy consistency. It layers cherry filling over a chilled crust—usually made from graham crackers or vanilla wafers—and is often topped with whipped cream or cream cheese-based layers.
This dessert is versatile too. You can make it with fresh, canned, or frozen cherries, and customize it based on how creamy or fruity you want it. Plus, it holds well in the refrigerator, making it ideal for prepping ahead of time for gatherings or holidays.
In short, cherry icebox pie is the perfect blend of nostalgic charm, minimal effort, and maximum flavor. It’s comfort food that stays cool, light, and totally crowd-pleasing.
A Look Back at the Icebox Era
To understand why it’s called a Cherry Icebox Pie, we need to rewind to a time before refrigerators. In the early 1900s, most American kitchens had a large wooden cabinet called an icebox. Inside, a block of ice kept perishables cold, and the cabinet served the same purpose as today’s refrigerator—just with more upkeep and daily ice delivery.
During this era, home cooks relied on the icebox not only to preserve food but also to chill desserts that didn’t require baking. These easy-to-make sweets became known as icebox desserts. They could be prepped in advance, assembled without cooking, and set in the icebox until firm and ready to serve.
Icebox pies emerged as a staple because they were cool, creamy, and convenient, especially in the warmer months when turning on the oven wasn’t appealing. Recipes were often printed on packaging for condensed milk or graham crackers, promoting quick desserts that used just a few ingredients. This method was ideal for busy families looking for something indulgent without the fuss of baking.
Transition to Modern Refrigeration
As technology advanced and electric refrigerators became common in households, the term “icebox” slowly faded from daily vocabulary. But many of the recipes from that time stuck around—especially icebox pies, which retained their name out of tradition.
Today, the term icebox pie usually refers to any pie that’s assembled cold and set in the refrigerator, not baked. While modern fridges have replaced old-school iceboxes, the name lives on as a nod to its nostalgic roots.
So when we say cherry icebox pie, we’re referring to a classic dessert made with love, layers, and a little history—no oven required.
The star of any cherry icebox pie is, of course, the cherries. But not all cherries are created equal, and your choice can dramatically change the flavor and texture of the final dessert.
Fresh Cherries: If cherries are in season, fresh is a flavorful, vibrant option. Sweet cherries like Bing or Rainier offer bold color and mild sweetness, while tart cherries (like Montmorency) give that classic pie-shop zing. If using fresh cherries, be sure to pit them and cook them briefly with a little sweetener and cornstarch to thicken the filling.
Frozen Cherries: These are a great year-round substitute. They retain much of their texture and flavor and can be cooked down just like fresh cherries. They often come pitted, saving time. Just make sure to thaw and drain them well before using, to avoid watery filling.
Canned Cherries or Cherry Pie Filling: Want the easiest route? Canned cherry pie filling offers convenience and consistency. Just check the label—some brands are overly sweet or contain artificial flavors. To improve the taste (we’ll talk more about this in Part 7), you can doctor the canned filling with lemon zest, almond extract, or spices.
No matter which type you choose, cherries bring color, a juicy bite, and that tart-sweet balance that makes this pie so irresistible.
Creamy vs. Custard-Based Icebox Fillings
Cherry icebox pie fillings vary widely, but most fall into one of two camps: creamy or custard-based.
Creamy Fillings: These use a mixture of ingredients like cream cheese, sweetened condensed milk, and whipped topping or heavy cream. The result is light, fluffy, and rich—kind of like cheesecake without the baking. This style pairs beautifully with a tart cherry layer on top or swirled throughout.
Custard Fillings: Made from egg yolks, sugar, and milk or cream, custard-based versions are more traditional. While they may require a little stovetop cooking to thicken the base, they still qualify as “icebox pies” since they’re set in the fridge, not baked in the oven.
Both types create smooth, luscious textures that contrast nicely with the fruit and crust. Choose the style based on how rich you want the dessert to be and how much prep time you’re willing to invest.
Also, don’t forget a few must-have supporting ingredients:
Graham cracker or cookie crust (more in Part 5)
Butter (to bind the crust)
Vanilla or almond extract (to enhance flavor)
Lemon juice or zest (to brighten the cherries)
These ingredients work together to build a pie that’s cool, creamy, and packed with flavor in every forkful.
The Best Thickener for Cherry Pie Filling
Comparing Cornstarch, Tapioca, and Flour
A cherry pie filling that’s too runny will sink your dessert—literally. That’s why choosing the right thickener is so important when making a cherry icebox pie. The goal is a filling that’s glossy, spoonable, and sliceable, not soupy or stiff.
Here’s how the most common thickeners compare:
Cornstarch The go-to thickener for many pie fillings, cornstarch is ideal for cherry icebox pie because it sets clear and smooth. It activates quickly when heated and gives that glossy finish cherry lovers expect. For most homemade fillings, you’ll need about 1 to 2 tablespoons per cup of fruit.
Pros: Neutral flavor, smooth texture, works fast
Cons: Can break down if overcooked or frozen and thawed
Tapioca Starch (or Instant Tapioca) Tapioca starch is an excellent thickener for fruit fillings. It creates a slightly more gel-like texture, which some people love. It’s also more stable for frozen pies. Use about 1½ tablespoons per cup of cherries.
Pros: Clearer set than cornstarch, freezer-friendly
Cons: Can leave a slight chewy texture if not ground fine enough
All-Purpose Flour Flour works in a pinch, but it tends to leave the filling cloudy and slightly pasty. It’s more common in baked pies than in no-bake or icebox versions. If you do use flour, you’ll need to cook the filling gently on the stovetop to remove the raw taste—about 2 tablespoons per cup of fruit.
Pros: Readily available
Cons: Heavier texture, muted flavor
Other Options
Arrowroot starch is a good cornstarch alternative, especially for those with corn allergies.
Pectin (natural fruit thickener) is also used in some traditional recipes but requires more precision to set correctly.
How to Avoid Watery Fillings
Even with the right thickener, poor technique can lead to runny results. Here are some tips to keep your cherry icebox pie filling thick and luscious:
Cook the filling: If you’re using fresh or frozen cherries, always cook them down slightly with sugar and your chosen thickener. Let the mixture bubble gently until it visibly thickens.
Drain excess liquid: If you’re working with canned or thawed cherries, be sure to drain them well before adding thickener to avoid extra moisture.
Let it cool before assembling: Hot or warm filling can melt your creamy base or loosen your crust. Let it cool to room temperature before spreading it into the pie.
Getting the thickener right ensures your cherry layer is bright, juicy, and holds its shape when sliced—no messy puddles on the plate.
Choosing and Prepping the Crust
Do You Need to Prebake Crust for Cherry Pie? (PAA3)
This is one of the most asked questions, especially when transitioning from a traditional cherry pie to a no-bake cherry icebox pie. In classic baked cherry pies, the crust absolutely needs to be prebaked (or par-baked) to avoid a soggy bottom and to support the hot, bubbling filling.
But with cherry icebox pie, prebaking is totally optional—and often unnecessary.
Since this is a no-bake dessert, the crust never comes into contact with high heat or a hot fruit filling. That means you don’t have to worry about sogginess in the same way. The filling sets in the fridge, not the oven, and the crust firms up during that chill time.
That said, if you prefer an extra-sturdy crust, you can bake your crust for about 8 minutes at 350°F—especially helpful if your kitchen runs warm or you plan to serve the pie at an outdoor event. Just be sure to cool the crust completely before adding the filling.
No-Bake Crusts: Graham Cracker & Cookie Bases
The most popular crust for cherry icebox pie is the graham cracker crust. It’s buttery, slightly sweet, and pairs beautifully with the tartness of cherries and creaminess of the filling.
How to Make a No-Bake Graham Cracker Crust:
1½ cups graham cracker crumbs
⅓ cup melted butter
2 tablespoons granulated sugar (optional)
Mix everything together until it resembles wet sand. Press the mixture firmly into a 9-inch pie pan, pushing up the sides for structure. Then chill the crust for at least 30 minutes before adding your filling. That’s it—no oven required.
Cookie Crust Variations: Want to mix things up? Try these crust alternatives:
Oreo Crust: Great for a chocolate-cherry combo
Vanilla Wafer Crust: Adds extra sweetness and a soft crunch
Shortbread Crust: Buttery and crumbly—perfect with whipped cream toppings
Each of these crusts follows the same process: crush, mix with melted butter, press, and chill.
Tips for Success:
Use a flat-bottomed glass or measuring cup to press the crust evenly and firmly.
Don’t skip the chilling step—it helps the butter solidify, keeping the crust intact when sliced.
If using a store-bought crust, choose a deep-dish version to accommodate thick fillings and toppings.
Choosing the right crust for your cherry icebox pie not only supports the structure—it enhances the entire flavor experience.
How to Make Cherry Icebox Pie – Step by Step
Making a cherry icebox pie is one of the easiest and most rewarding no-bake desserts you can whip up. In just a few simple steps, you’ll go from mixing to chilling to serving a cool, creamy pie that’s bursting with flavor and nostalgia.
Here’s your step-by-step guide:
Step 1: Make the No-Bake Crust
Start by making the base for your pie. The classic choice is a graham cracker crust, but vanilla wafers or crushed shortbread cookies work beautifully too.
You’ll need:
1½ cups graham cracker crumbs
⅓ cup melted butter
2 tablespoons sugar (optional)
Instructions:
Combine crumbs, melted butter, and sugar in a bowl.
Mix until the texture resembles wet sand.
Press firmly into the bottom and up the sides of a 9-inch pie pan.
Chill in the refrigerator for at least 30 minutes (or bake at 350°F for 8 minutes if preferred, then cool completely).
Step 2: Prepare the Creamy Filling
This is what gives cherry icebox pie its signature smooth, rich texture. You can go with a whipped cream + sweetened condensed milk base or use cream cheese for added tang.
Basic Cream Filling Ingredients:
1 (14 oz) can sweetened condensed milk
8 oz cream cheese, softened
1 teaspoon vanilla extract
Juice of ½ lemon (optional for brightness)
1½ cups whipped cream or whipped topping
Instructions:
In a mixing bowl, beat cream cheese until smooth.
Add sweetened condensed milk, vanilla, and lemon juice.
Fold in whipped cream until the mixture is fluffy and uniform.
Spread evenly over the chilled crust.
Step 3: Make or Prep the Cherry Topping
If you’re using store-bought cherry pie filling, skip straight to assembly. If using fresh or frozen cherries, here’s a quick homemade cherry topping:
Homemade Cherry Topping Ingredients:
2½ cups fresh or frozen cherries (pitted)
½ cup sugar
1 tablespoon lemon juice
1½ tablespoons cornstarch
2 tablespoons water
½ teaspoon almond or vanilla extract (optional)
Instructions:
In a saucepan over medium heat, combine cherries, sugar, and lemon juice.
Stir and bring to a simmer until juices release (about 5–7 minutes).
In a small bowl, mix cornstarch with water until dissolved, then stir into the cherries.
Cook for another 2–3 minutes, until thick and glossy.
Stir in almond or vanilla extract, then let cool completely.
Step 4: Assemble the Pie
Once the crust and filling are ready and the cherry topping is cooled, layer the cherries over the creamy filling.
Use a spatula to spread evenly or leave it rustic with dollops and swirls.
For extra flair, garnish with whipped cream, shaved white chocolate, or fresh cherry halves.
Step 5: Chill and Serve
Place the pie in the refrigerator for at least 4 hours, or overnight if possible. This helps the layers firm up and makes for cleaner slices.
When ready to serve:
Slice with a sharp knife.
Wipe the blade between cuts for clean edges.
Serve cold, directly from the fridge.
What to Add to Cherry Pie Filling to Make It Taste Better? (PAA4)
Flavor Enhancers: Vanilla, Almond, Citrus Zest
Even if you’re starting with canned cherry pie filling, a few small additions can make a massive difference. If you’re making your cherry topping from scratch (as covered in Part 6), these upgrades will still apply—and take your pie to the next level.
Here are the top additions that bakers swear by:
1. Almond Extract This is one of the most powerful tools in your flavor arsenal. Just a ¼ to ½ teaspoon added to your cherry mixture boosts its natural flavor and makes it taste more like a bakery-style dessert. Almond pairs beautifully with cherries and brings out their sweetness without being overpowering.
2. Vanilla Extract Even a basic cherry filling benefits from a touch of vanilla. A ½ to 1 teaspoon softens the tartness of the fruit and rounds out the flavor profile. For deeper flavor, use pure vanilla extract, not imitation.
3. Citrus Zest or Juice Lemon or orange zest can cut through the sweetness and add brightness. Try:
1 teaspoon fresh lemon zest for a fresh, zingy lift
1 tablespoon lemon juice to balance out sweetness in canned fillings
Orange zest for a slightly sweeter citrus twist
These natural acids make the cherry flavor more vibrant and keep the pie from tasting one-dimensional.
4. A Pinch of Salt It might sound odd, but just a tiny pinch of salt enhances all the other flavors in the filling, making them pop. Salt acts as a flavor enhancer, even in desserts.
5. Warm Spices (Optional) For a cozy or holiday twist, try adding:
A pinch of cinnamon
A tiny dash of nutmeg
A whisper of clove or cardamom
These spices add warmth and complexity—especially tasty if you serve your cherry icebox pie in cooler seasons.
Balancing Tartness with Sweetness
If you’re working with tart cherries or homemade filling and it tastes too sour, you don’t want to overdo it with sugar. Instead, balance it smartly:
Add a spoonful of honey or maple syrup for natural sweetness.
Use a mashed banana or applesauce as a hidden sweetener in the filling base (works best in creamy pies).
Mix in sweetened condensed milk for both richness and mild sweetness.
On the flip side, if your canned cherry filling is too sweet or artificial-tasting:
Add lemon juice, zest, or a splash of unsweetened cherry juice to balance it out.
A tablespoon of Greek yogurt or sour cream stirred into the creamy base also offsets the sweetness without affecting texture.
The goal is always balance—where tart, sweet, and rich flavors blend harmoniously. A few small tweaks can elevate even store-bought filling to gourmet level.
Easy Variations of Cherry Icebox Pie
The classic cherry icebox pie is delicious on its own—but once you know the basics, the flavor possibilities are endless. Whether you’re looking to impress guests, experiment with textures, or cater to specific diets, these easy variations add creativity and personal flair to your no-bake dessert.
Chocolate Cherry Icebox Pie
Want a richer, more decadent version? Chocolate and cherry are a match made in dessert heaven.
How to do it:
Swap the graham cracker crust for an Oreo or chocolate cookie crust.
Add ½ cup mini chocolate chips or shaved chocolate to the cream filling.
Use a few tablespoons of cocoa powder in the cream layer for a chocolate base.
Drizzle with melted chocolate or ganache before chilling.
Bonus Tip: Stir in a teaspoon of espresso powder for a mocha-cherry twist.
Low-Sugar or Refined Sugar-Free Version
Cutting back on sugar? You can still enjoy cherry icebox pie by making a few smart substitutions.
Low-sugar swaps:
Use no-sugar-added cherry pie filling or make your own with stevia, erythritol, or monk fruit sweeteners.
Replace sweetened condensed milk with a low-sugar homemade version (coconut milk + sweetener).
Choose a sugar-free graham cracker crust or make one using crushed nuts and coconut oil.
Top with unsweetened whipped cream or coconut whipped cream for a dairy-free, no-sugar topping.
These swaps keep the dessert light and diabetic-friendly without losing the creaminess or fruity flavor.
Dairy-Free & Vegan Cherry Icebox Pie
Perfect for plant-based eaters, this version skips the dairy but keeps all the indulgence.
How to make it dairy-free:
Use vegan butter or coconut oil for the crust.
Replace condensed milk with sweetened coconut condensed milk.
Use plant-based cream cheese or blended silken tofu for the creamy layer.
Top with coconut whipped cream or a layer of thick, chilled cashew cream.
Make sure your pie filling is vegan-friendly—homemade is usually your best bet.
Cherry Cheesecake Icebox Pie
This one’s for cheesecake lovers who don’t want to turn on the oven.
Modifications:
Double the cream cheese in the filling.
Add ½ cup powdered sugar and a little lemon juice to mimic cheesecake filling.
Chill the pie longer (ideally overnight) for a denser texture.
Top with fresh cherries, cherry sauce, or even a swirl of cherry compote for extra indulgence.
Mini Cherry Icebox Pies (Perfect for Parties)
Want a fun twist for gatherings or kid-friendly treats? Make individual pies using cupcake liners, ramekins, or mason jar lids.
How-to:
Press crust into individual cups.
Spoon in filling and top with cherries.
Chill and serve with mini spoons or forks.
These little desserts are perfect for portion control and make your dessert table look extra charming.
Frequently Asked Questions (FAQs)
Why is it called an icebox pie?
The term icebox pie dates back to the early 1900s, when home refrigeration involved an actual icebox—a wooden cabinet chilled by a block of ice. Icebox pies became popular because they could be prepared without baking and stored in the icebox to set and chill. Today, even though we use modern refrigerators, the name has stuck. So, a cherry icebox pie simply refers to a pie that sets in the fridge instead of the oven.
What is the best thickener for cherry pie filling?
The most reliable thickener for cherry pie filling—especially in no-bake or icebox pies—is cornstarch. It creates a glossy, smooth texture without altering the cherry flavor. Tapioca starch is also a great option, offering a clear set and slightly more gel-like texture. Avoid using flour, as it can make the filling cloudy and dull the flavor. Whichever thickener you choose, make sure to gently cook the filling to activate it and avoid a watery pie.
Do I need to prebake crust for cherry pie?
If you’re making a traditional baked cherry pie, yes, the crust typically needs to be prebaked or par-baked. However, for cherry icebox pie, prebaking is not necessary. The crust—usually made from crushed graham crackers or cookies—sets in the fridge along with the creamy filling. If you prefer a firmer base, you can bake it briefly, but chilling alone is usually enough.
What to add to cherry pie filling to make it taste better?
To take your cherry pie filling from basic to bakery-quality, add:
A splash of almond extract for depth
A teaspoon of vanilla to round out flavors
A touch of lemon juice or zest for brightness
A pinch of salt to enhance sweetness If you’re using canned filling, these upgrades can mask any artificial flavor and bring out the natural tartness of the cherries. Homemade fillings can also benefit from these subtle enhancements.
Cherry Icebox Pie – The Ultimate No-Bake Dessert Guide
5 Stars 4 Stars 3 Stars 2 Stars 1 Star No reviews
Author:Scoot Jirwin
Prep Time:20 minutes
Cook Time:4 hours
Total Time:4 hours 20 minutes
Description
A creamy, fruity no-bake cherry icebox pie made with a graham cracker crust, rich cream cheese filling, and sweet cherry topping. A refreshing dessert for warm days or festive gatherings—no oven required!
Ingredients
Scale
For the Crust:
1½ cups graham cracker crumbs
⅓ cup melted butter
For the Filling:
8 oz cream cheese, softened
1 (14 oz) can sweetened condensed milk
1 teaspoon vanilla extract
Juice of ½ lemon
1½ cups whipped topping or whipped cream
For the Topping:
2½ cups cherry pie filling or homemade cherry topping
Instructions
Instructions
Make the crust: In a bowl, combine graham cracker crumbs and melted butter. Mix well and press into the bottom and sides of a 9-inch pie pan. Chill in the fridge for at least 30 minutes.
Prepare the filling: In another bowl, beat the softened cream cheese until smooth. Add sweetened condensed milk, vanilla extract, and lemon juice. Mix until creamy, then fold in the whipped topping until fully combined.
Assemble the pie: Spread the cream filling over the chilled crust. Smooth the top with a spatula.
Add the cherry topping: Spoon the cherry pie filling evenly over the cream layer.
Chill and serve: Refrigerate the pie for at least 4 hours (overnight is even better). Slice and serve cold. Garnish with extra whipped cream if desired.