How Cherry Icebox Pie Became a Summer StapleI still remember the first time I had a cherry icebox pie. I was about twelve, sitting at my grandma’s weathered kitchen table on a breezy July afternoon in Beloit. The pie had been chilling in the old green fridge all morning. It was a no-bake wonder—sweet, tart, […]
Pin itCherry Icebox Pie – A Cool, Creamy Classic Dessert Favorite | Recipesgem
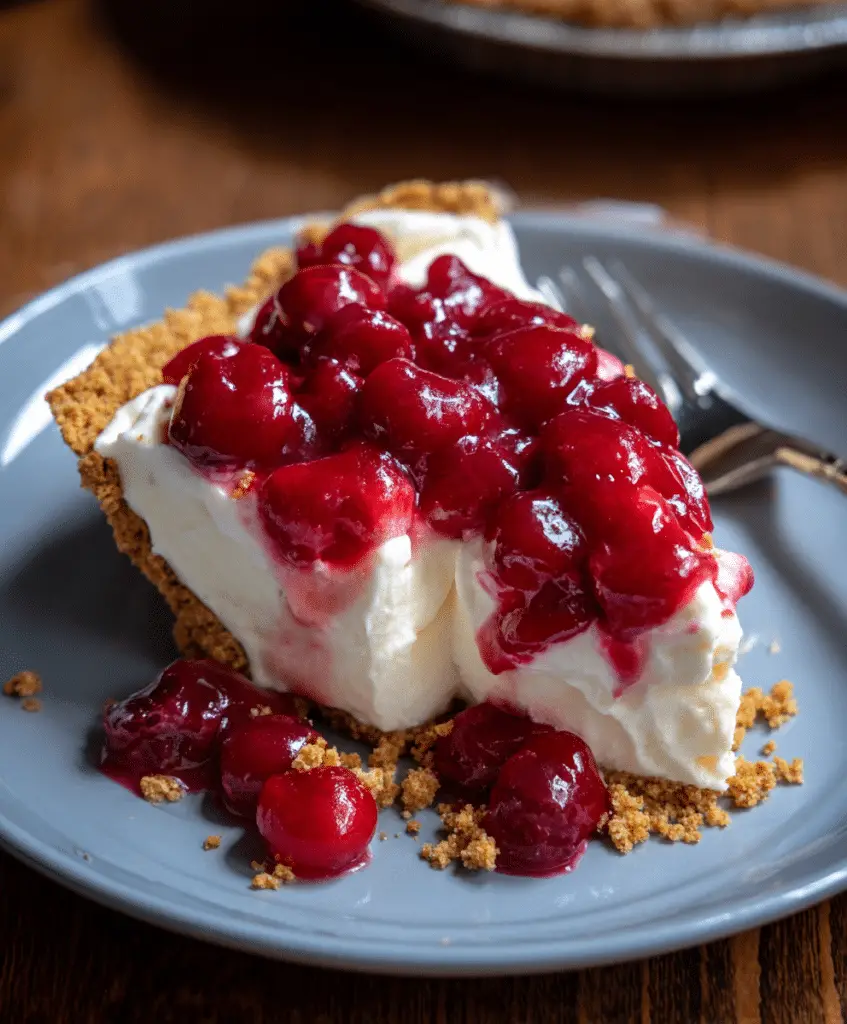
How Cherry Icebox Pie Became a Summer Staple I still remember the first time I had a cherry icebox pie. I was about twelve, sitting at my grandma’s weathered kitchen table on a breezy July afternoon in Beloit. The pie had been chilling in the old green fridge all morning. It was a no-bake wonder—sweet, tart, creamy, and perfectly cold after a morning of running wild outside with my cousins. That pie? It left an impression.
Now, in my own kitchen, cherry icebox pie is a family favorite I’ve passed on to my wife and daughters. It’s the kind of dessert that gets requested for birthday dinners, potlucks, and those lazy Sunday nights when we’re craving something sweet but don’t want to heat up the house. The creamy filling, the graham cracker crust, and the ruby red cherry topping are a match made in summer dessert heaven.
This recipe has evolved through years of trial, tasting, and tweaking. I’ve added a hint of almond extract to boost the cherry flavor, swapped in homemade whipped cream, and even played with different crusts like crushed vanilla wafers. But the classic version? That’s the one that stays in rotation, and it’s what I’m sharing here today.
What I love about cherry icebox pie is that it’s unfussy and approachable, yet surprisingly satisfying. It doesn’t try too hard—and that’s what makes it so great. Whether you use homemade cherry filling or enhance a canned one (more on that soon), the end result is indulgent, nostalgic, and deeply satisfying.
What to Add to Cherry Pie Filling for Better Flavor Let’s face it—canned cherry pie filling can be a little flat straight from the can. The good news? It doesn’t take much to turn it into something truly crave-worthy for your cherry icebox pie. First, stir in a splash of almond extract—just a quarter teaspoon goes a long way in amplifying the cherry flavor. It mimics the natural bitterness found in cherry pits, adding depth without overpowering.
Next, add a touch of citrus. A teaspoon of fresh lemon juice brightens the entire filling and balances the sweetness. You can also fold in a handful of halved fresh or frozen cherries to boost texture and make it feel more homemade. Some bakers even stir in a bit of cinnamon or vanilla extract for extra warmth and complexity.
If you really want to take your cherry filling to the next level, let it chill in the fridge for 30 minutes before using it. This gives the added ingredients time to mingle and settle into a more robust, layered flavor.
For another no-bake option with a fruit-forward twist, check out this Pineapple Cool Whip Pie—equally refreshing and easy to prep!
Does Homemade Cherry Icebox Pie Need to Be Refrigerated? Absolutely. Because this pie is made with cream cheese, whipped topping, and fruit filling, refrigeration isn’t optional—it’s essential. After assembling your cherry icebox pie, cover it tightly with plastic wrap or foil and refrigerate for at least 4 hours, preferably overnight. This gives the filling time to set and the flavors time to develop.
If you’re prepping it in advance for an event, it can safely stay chilled for up to 3–4 days. Just make sure it’s stored in a sealed container or covered tightly to prevent moisture or fridge odors from sneaking in. It’s also wise to avoid freezing this pie, as the creamy base can separate once thawed.
Craving more creamy, cool desserts? Don’t miss this crowd-pleasing No-Bake Pumpkin Cheesecake or my Easy Banana Pudding with Condensed Milk—both perfect for make-ahead sweet tooth moments.
Making Cherry Icebox Pie from Scratch
How Long to Can Cherry Pie Filling Canning your own cherry pie filling turns a basic cherry icebox pie into something unforgettable. Not only does it add bold flavor, but you also control the texture and sweetness. Start with sour cherries—fresh or frozen. Once pitted, combine them with sugar, lemon juice, and Clear Jel for safe thickening. Avoid cornstarch, which isn’t safe for home canning.
Simmer until the filling thickens, then ladle it into sterilized jars, leaving 1 inch of headspace. Process in a boiling water bath for 30 minutes, adjusting for altitude if needed. Let the jars cool for 12–24 hours. Once sealed, you can store them in a cool, dry place for up to 18 months.
That homemade cherry filling isn’t just for pies. Spoon it over this Chocolate Lasagna Dessert or swirl it into a creamy Vanilla Pudding Pie for a next-level twist.
How to Know When Your Cherry Icebox Pie Is Done You’re not baking this pie—but it still needs time to “set.” After assembling, refrigerate it for at least 4 hours. Overnight is even better. Once firm, the pie should slice clean and hold its shape without sagging or sliding. Press the center gently with your finger—if it feels firm and bounces slightly, it’s ready.
If the filling jiggles loosely or sticks to the foil cover, give it another hour or two. The chill time lets the cream cheese stabilize, and the whipped topping locks everything in place.
And here’s a tip: if you’re adding fresh cherries or juicy add-ins, drain them well before folding them into the filling. Too much moisture can prevent your pie from setting.
Looking for more chilled no-bake hits? You’ll love this silky Cool Whip Pie and the bright citrusy bite of this Key Lime Icebox Pie.
Cherry Pie FAQs & Final Touches
What to Add to Cherry Pie Filling to Make It Taste Better? To improve the taste of canned cherry pie filling, stir in ½ teaspoon almond extract and a splash of fresh lemon juice. Both elevate the cherry flavor and cut the syrupy sweetness. Adding a pinch of cinnamon or vanilla works well, too. For texture, fold in chopped fresh cherries. Let it rest in the fridge 30 minutes before using to develop deeper flavor.
Does Homemade Cherry Pie Need to Be Refrigerated? Yes, always refrigerate homemade cherry pie—especially icebox versions with cream cheese or whipped topping. Store it tightly covered for 3–4 days. It’s best chilled overnight before serving for proper setting and optimal flavor. Freezing is not recommended due to texture breakdown.
How Long to Can Cherry Pie Filling? Once prepared with Clear Jel, ladle your hot filling into sterilized jars. Process in a boiling water bath for 30 minutes, adjusting time for altitude. Canned cherry filling lasts 12 to 18 months when stored in a cool, dark space. It’s a great make-ahead base for pies, turnovers, and even layered trifles like this Strawberry Cream Dessert.
How to Know Cherry Pie Is Done? For baked cherry pies, you’ll see bubbling juices and a golden brown crust when it’s ready. But for icebox pies like this, it’s all about the chill. Once the filling is firm and slices clean, it’s done. It should bounce slightly when touched, not jiggle loosely.
Conclusion: A Cool Favorite That Never Fails Cherry Icebox Pie is the kind of recipe that sticks with you. It’s creamy, tangy, sweet, and absolutely no-fuss. Whether you’re serving it after Sunday dinner or at a Fourth of July cookout, it never disappoints. It’s a throwback dessert with timeless appeal—and it’s endlessly adaptable.
From canned filling upgrades to homemade cherry preservation, you now have every trick to make this dessert shine. If you loved this, don’t miss my No-Bake Chocolate Chip Cheesecake or this silky Coconut Cream Pie—both chilling champs in their own right.
This pie earned its place at my family’s table. Now it’s ready to become a star at yours.
This no-bake cherry icebox pie is creamy, cool, and bursting with cherry flavor. Perfect for hot summer days or when you need a fast, crowd-pleasing dessert.
Ingredients
Scale
1 9-inch graham cracker crust
1 (8 oz) package cream cheese, softened
1 (8 oz) tub whipped topping (like Cool Whip)
1/2 cup powdered sugar
1/2 tsp almond extract
1 tsp lemon juice
1 (21 oz) can cherry pie filling
Instructions
1. In a large bowl, beat the cream cheese until smooth.